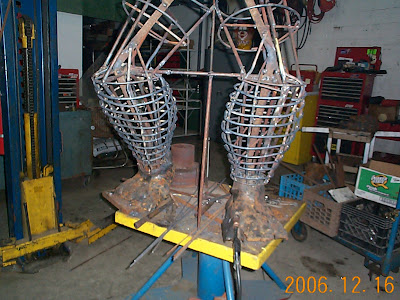
After completing the head, feet & hands, it was time to build something to put them on. After examining our original skeleton, we discovered that it was way off, so we decided it would be best to start from scratch. We'd start from the bottom & work our way up.
After welding the feet to a temporary base, we tacked 1/2'' rods to the feet, about 10-15 rods per leg. These would create the underlying shape of the legs & count as reinforcement. Here it looks like his legs exploded like Elmer Fudd's gun with one of Bugs' carrots wedged in the barrel.
We carefully shaped the rods according to our design drawing & ended up with a shapely, muscular-looking limb. After completing the lower legs, we shaped out the upper legs...
By this point, it was too cold to work outside anymore, so we moved the project indoors for the winter.
For the upper legs, we wanted to experiment a bit to see if using rings would help define the limbs better than just playing by ear. Using the rings, we completed the upper legs twice as quick as the lower ones. The rings were a more precise, easy & fast way to shape the limbs. These were essential by the time we got to the arms.
But before getting to that point, we wanted to shape the legs even further by "wrapping" them. Using a thinner rod, we heated, bent & spiraled up each leg, forming each leg to it's final shape. This would also make it much easier when it came time to plate them.
Here's me, hamming it up as usual...
& finally we reached his waist... TA-DAAAAA!
Now for the upper body.
We put the project down on good ol' terra firma for this part. Here we began to estimate where the head, hands, shoulders & arms would be. Using temporary rods for temporary support, we layed out the upper body (temporarily).
More pork from the ham...
& here he is, in all his temporary glory. Here his chest looks like a birdcage & his arms are like corn stalks. He kinda looks like a freaky bizarro Popeye or something.
Then we created his shoulders out of 3 rings forming a sphere & we put rings on the arms for shape. You can also see small tubes inside the shoulder & the arm. This is for when we slide the arms on & off for positioning & plating.
-Notice the rust on his face. See how it's kinda orangey? When he rusts all over, he'll be completely orange like that. Rusty, earthy orange looks a lot better than orange spray paint.
-Also notice the date of these last two pictures. We were working on this thing on New Years' Eve, only two or three hours before '06 was over.
-More to come later! Remember to comment! Stay tuned!


4 comments:
I can't wait until the Rockman is completely done and standing in front of the school. It's going to be awesome! Keep up the good work.
Thanks, OmegaEye! We'll just have to wait & see what happens.
Wow Mike it really looks like its coming along great. I'm looking foward to the completed version and to more comics on this blog. When you and your Dad were designing it what did it look like on paper, I mean did you have to do a redrawing of "rockman" from comic book form to design form before you could start building.
Your Fan,
David Spector
Hey Dave! Nice to hear from ya!
If you go into my post archives & check out my first Rockman post "Rockman, Shmockman", you'll see the drawing of The Thing that we used as our reference. I scanned it out of the "How to Draw Comics the Marvel Way" book. That's the only reference we had, the sides & back were done by eye & we just did what we felt looked OK.
As for the comic, I've been having some story trouble on it. I couldn't think of the right story. But I got the idea today & I'm starting to draft it out. It'll probably be up on the blog by early next week if all goes well.
Post a Comment